Compress video with HandBrake

MEPO 10-010

For Use

The media portal is still online. However, it is currently not possible to log in to the media portal. Please contact FELIX support (felix-support@hfu.eu).

What you need to know

HandBrake is an open source video-transcoding software. With it, it is possible to convert videos to different video formats. Before uploading a video to the media portal, you should convert it to a compatible video format (e.g. MP4). Below is an explanation of how to convert a video using HandBrake .

If you don't have HandBrake installed yet, you can download and install it from the following link (for Windows, Mac, Linux):  https://handbrake.fr/

What you have to do

  1. After opening HandBrake, you need to insert the video. You can either insert single videos or a folder with several videos.

    • You can insert videos/folders via a dialog box when you select one of the displayed options in the "Source Selection" window, or you can drag and drop your files/folders directly into HandBrake.

  2. Under the "Queue" tab you can subsequently add more videos to the queue.

    • Videos inserted by means of a folder you need to "Add to Queue". Click the corresponding button at the top and choose between "Add Momentary", "Add All" and "Add Selection".

    • The "Queue"  button will open a window that will show you a list of all the videos that are in the queue.

  3. In the main window you can change the location of your converted videos at the bottom of the window if needed.

    • Using the "Select" button you can choose the storage location via a window that will open.

    • If you want to save multiple videos of a queue to the same location, you have to change the following in the settings: To do this, click on the "Extra" tab, then on "Settings". Then click on "Output files" (on the left). At "Automatic file naming" "Automatically name output files" should be activated. The "Always use the default path for each new name generated" checkbox must be deactivated. The desired location can then be selected in the main window. If necessary, this can be constantly redefined in the main window.

  4. Over the "When done" button, both in the main window and in the "Queue" window, you can set actions that your computer should perform after the conversion process (e.g. quit HandBrake/log off user/energy saving mode/shutdown...) if you want to let the conversion run e.g. overnight.

    • Depending on how big the video file is and how much processing power your computer has, the conversion process can take a long time.

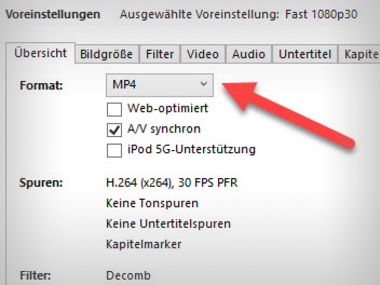
  5. To upload the video to Felix, the video must be in .MP4 format. If this is not the case, you must set this before the conversion process. To do this, you can set the format accordingly in the drop-down menu next to the displayed preview (see Figure 1).

    • If you often work with HandBrake, it may be useful to select "Always use MP4" under the "Extras" tab in the "Settings" for "Output files" (see Figure 2).

  6. To achieve maximum compression with sufficient video quality, you should set the quality of the video in the "Preferences" drop-down menu. We recommend the "Fast 1080p30" or "Fast 720p30" methods, which are included in the "General" section.

    • Note for changing the parameters independently:
      Care should be taken that the frame rate (in the Video tab) is not set below 20 frames / second and the constant quality (in the Video tab) is set to a value of 25 or lower (lower value = better quality). The sample rate of the audio (in the Audio tab) should not be set below 16 kHz.

    • With the help of the preview you can directly see all the changes and test different settings accordingly.

  7. Once you have made all the settings and are satisfied with the preview, you can start converting the queued video(s) using the "Start Encoding" or "Start Queue" button.

    • After the conversion is successfully completed, the video will be in the preset saving path (step 3).

Problems or questions?